Well, there are many ways to shoot a picture, what I am going to describe here is how I go about taking all the pictures you have seen on The Painting Shop.
To start, I guess everyone usually would suggest building a lightbox so that the picture captured are even with the lighting. It did occur to me to build a lightbox, but the thought of storing it is an issue as my shelves are filled with boxes of unopened miniatures and painted miniatures, no space for a bulky box, haha. Maybe I could build a portable one… hmm, this thought just strike me as I am writing this. I will keep this for my next project… haha.
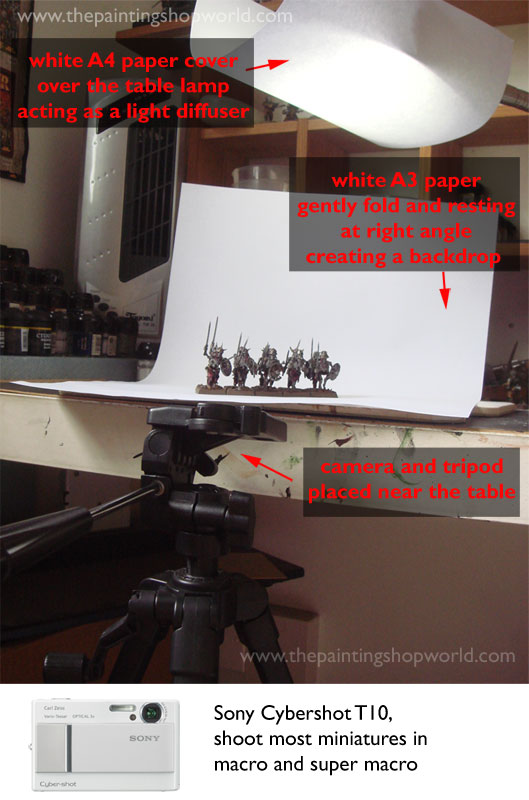
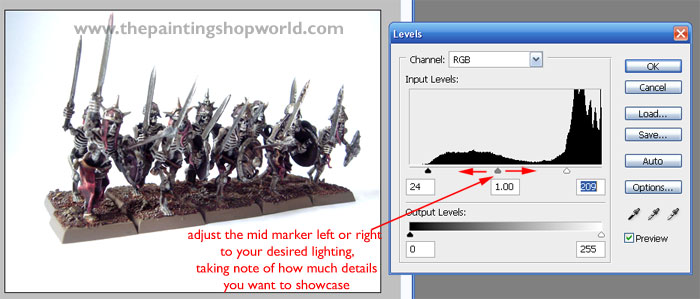
Anyway, usually my setup is simple. Lay a piece of A3 white paper gently folded upright with support at the back, like you see in the picture above. This will create a simple white backdrop. I am using a table lamp with a energy saving type bulb with cool daylight, in other words, its white light, much like in the day lighting that sort. I covered the lamp with a piece of A4 white paper to act as a diffuser. This will diffuser the white light making it softer with not so much hard light shining on the miniature.
With that setup, miniature placed, open up the tripod and mount the camera. I am using a Sony Cybershot T10. Turn the camera on, and adjust the setting on your camera and see how the lighting goes. My camera has not much setting, usually its either I use the auto mode or the program mode, and set the macro or super macro mode. Not all camera have super macro mode, my Sony T10 allows object to be shot super near, almost touching the len. Its pretty fun exciting to see things in super super close up… haha.
Depending on your camera brand and make, you will have to adjust the lamp or camera setting to achieve the lighting condition you would prefer. The complaint I have recently with my Sony T10 is, the focus point is pretty restricted, focus set by the camera, no choice. I did consider getting a better camera but that’s a later plan. I am looking into the new breed of camera, the mirrorless interchangeable lens (MIL) camera. Its like cross breed of auto camera and DSLR camera. Its lens are interchangeable, and I am eyeing on a macro lens. The two choice I have in mind is the Panasonic G2 and Olympus EPL1. You can check out a G2 review here. Will talk more about it when I ever get my hands on them. Meantime, I will just live with my T10.
Usually I will grab a few shots before I head to edit with my digtal imaging software, example photoshop. In editing usually, there are only 2 things I do, adjust the image level histogram, crop the image and finally resize and save it for the web.
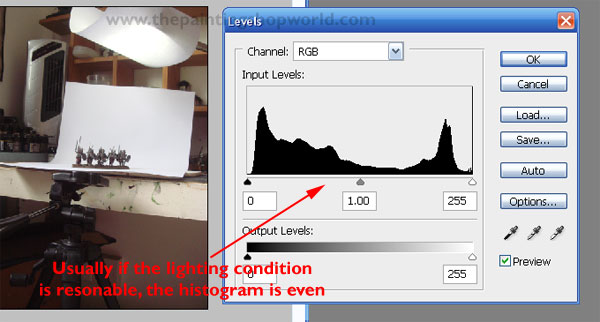
The level adjustment is what I usually use to adjust the histogram. This option is available in most image editing software. Some camera displays the histogram on the LCD screen of the camera, this will allow you to see how the level is like.
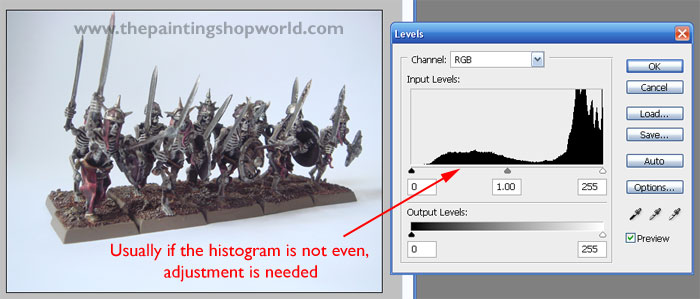
As straight forward as it is, its to adjust the picture bright and dark level. Open the picture and see the level histogram. Usually a good picture with good lighting, the histogram is sort of balance and evenly distributed. If the histogram is not evenly distributed, adjustment is needed. Alternatively, you can always use the auto leveling is some image editing software. But usually I like to adjust myself to control and decide the image lighting.
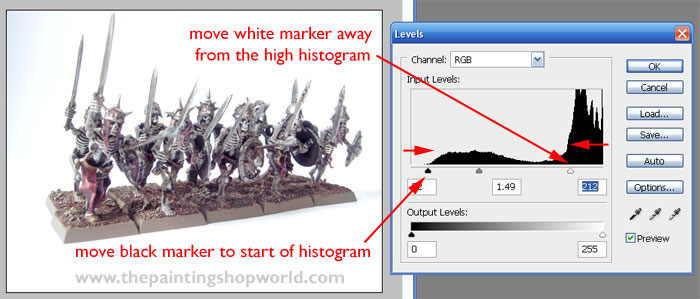
Start by dragging the right and left triangle marker to fit the histogram within, like in the picture.
Next adjust the middle triangle maker to the left or right, adjust the image to be darker or brighter. Take note of the details in the image as in how much details in the image is darken or over exposed. There’s no best option, but just adjust it until you feel that the image is what you like.
If you notice in most of the shots for my miniatures, there is always a dark tint around the edge of the image, that is because I did not use a lightbox, and light source form my lamp is leaked all over and not contained in a box. If I were to adjust the white level till the blue tint is gone, then the image is over exposed. If a lightbox is use, usually there will not be this problem.
For now, I am cool with my this special effect on all my shot of miniatures, much like a lomography shot.
Maybe the Machine Spirit bless my T10, while saving more gold coins for the G2… haha, Cheers!
Share this:
- Click to print (Opens in new window)
- Click to email a link to a friend (Opens in new window)
- Click to share on Tumblr (Opens in new window)
- Click to share on Facebook (Opens in new window)
- Click to share on Reddit (Opens in new window)
- Click to share on Twitter (Opens in new window)
- Click to share on Pinterest (Opens in new window)
One Response
“If you notice in most of the shots for my miniatures, there is always a dark tint around the edge of the image, that is because I have did not use a lightbox, and light source form my lamp is leak all over and not contain in a box.”
Hiya! Great article 🙂 I just… can’t understand this sentence.
Thanks for putting this together! GREAT info and pictures 🙂